User Tools
Sidebar
QO-100 Linux SDR Transceiver
Reference frequencies
A precise reference frequency is required for waterfall and audio receiver to work correctly.
The following frequency deviations can be compensated:
1. frequency errors of the TCXO in the Pluto
2. deviations of the LNB
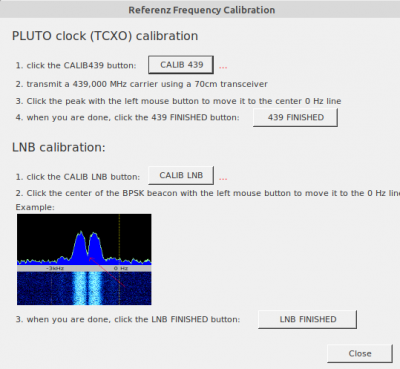
Calibration window
Pluto TCXO
A Pluto ALWAYS needs a new precision TCXO, since the one installed by the manufacturer is not suitable for QO100 operation. But even with a precision TCXO there can be deviations of some kHz which have to be corrected.
Since many radio amateurs do not have highly accurate frequency references, a normal 70cm transceiver, e.g. a 70cm handheld radio, is used here. These are usually tuned to within a few 100 Hz, which is accurate enough for our purposes. If available, a signal generator can also be used.
First click on “CALIB 439”. The receiver of the Pluto is now adjusted so that the frequency of 439 MHz is exactly in the middle (on the 0 Hz) line.
Now you set a 70cm transceiver to 439,000 MHz transmit frequency (if necessary don't forget to switch off a relay offset!) and press the PTT key.
A peak appears in the spectrum. If this is too big, remove the antenna from the radio or use a dummy load. Click with the mouse as exactly as possible on this peak (in the upper and also lower spectrum),
The alignment is finished as soon as the peak is exactly on the middle 0 Hz line. Then click “439 FINISHED” to finish the alignment.
LNB
To adjust the LNB it is assumed that the above Pluto adjustment has been done.
The LNB alignment is based on the middle BPSK beacon with its typical 2 humps.
Start the alignment by clicking on “CALIB LNB”.
Now the BPSK beacon will be visible somewhere in the spectrum. If you don't see it in the lower spectrum, look for it in the upper spectrum. This has a range of 560kHz and even with very bad LNB clocks you will find it there.
Click on this beacon signal. In the lower waterfall you can click in the middle of the beacon until the signal is exactly on the 0 Hz line.
Now click on “LNB FINISHED” to finish the adjustment.
The adjustment values are stored and are active also with the next start of the software.
Checking the adjustment values, manual adjustment
The adjustment values determined above are also displayed in the SETUP window as numerical values. If necessary, you can change these manually here. The offset values are in Hz.


