User Tools
Sidebar
Table of Contents
QO-100 Linux SDR Transceiver
Configuration
Pluto settings
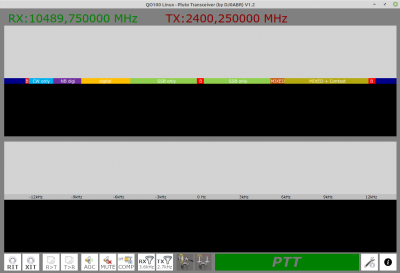
The window is empty at first, because the transceiver needs to know where to find the Pluto.
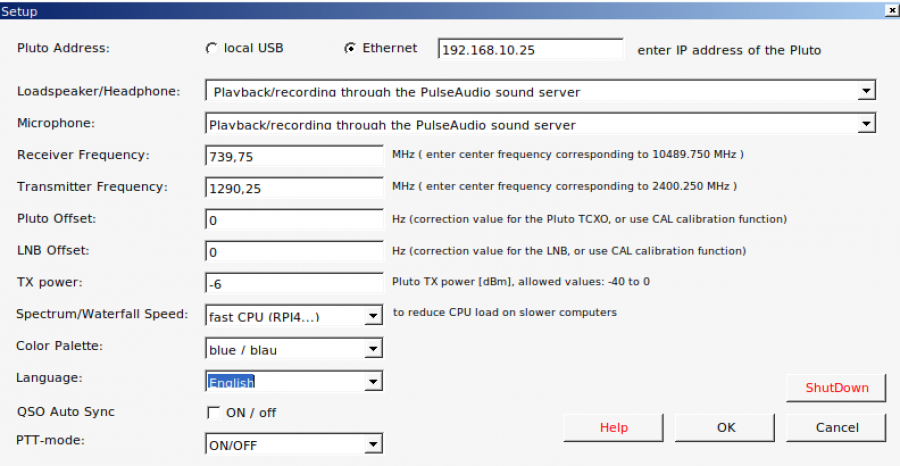
To do this, click on “SETUP” ![]() in the lower right corner. The setup window will open:
in the lower right corner. The setup window will open:
Pluto: the Pluto can be connected directly via USB cable, in this case select “local USB”. If you have connected the Pluto via ETH/USB adapter, select “Ethernet” and enter the IP address of the Pluto.
Note: the data rate between the QO100 transceiver and Pluto is just under 20Mbit/s. Therefore the operation should be done via Ethernet cable. Over WLAN dropouts are to be expected, but if your WLAN is good then give it a try.
Audio settings
Usually you will use a USB sound card, there are also comfortable headsets with integrated sound card. In the lists “Loudspeaker” and “Microphone” you select the suitable audio device.
Note about Raspberry-OS and Odroid-Ubuntu: with this operating system a real chaos of audio devices is output. No matter what USB device you use, with Rasperry-OS you should always choose the top selection: “Playback/Recording through pulseaudio sound server”. Then open the audio mixer via the button “MIXER” (“pavucontrol”: is already installed) and do the assignment of the audio devices here. The volume can also be set here. By the way, using the mixer is always recommended, even on other computers.
RX Frequency Settings
the Pluto receiver is set to the “Receiver Frequency”. The correct frequency depends on the satellite receiving system and always refers to the frequency of the middle BPSK beacon on 10489.750 MHz. Here are a few examples:
Output of a standard LNB with 25 MHz reference is connected to the Pluto:.
“Receiver Frequency” = 10489.75 - 390 x 25 = 739.75
Output of a standard LNB with 24 MHz reference is connected to the Pluto:
“Receiver Frequency” = 10489.75 - 390 x 24 = 1129.75
this setting applies e.g. to the Amsat downconverter, which works with 24 MHz LNB reference.
Output of the Amsat downconverter (set to position 6, 2m band) is connected to the Pluto:
Switch settings on the downconverter see here: AMSAT-DL QO-100 DownConverter V3d
“Receiver Frequency” = 144.75.
The decimal place of the set frequency will practically always be “.75”, because this is the frequency of the middle beacon, to which the frequency setting always refers.
TX Frequency Settings
The Pluto transmitter is set to the “Transmitter Frequency”. The correct frequency depends on the satellite receiving system and always refers to the frequency of the center BPSK beacon at 2400.25 MHz. Here are a few examples:
Pluto transmits on 2.4GHz and is directly connected to the antenna via a PA:
“Transmitter Frequency”: 2400.250
Pluto transmits into the Amsat Upconverter and this is set to 1290 MHz:
Jumper settings on the upconverter see here, jumper “C”: QO-100 Amsat-DL UPconverter with 6W PA
“Transmitter Frequency”: 1290.250
(the frequency information of the table for jumper “C” can be taken over directly.
Pluto and LNB Offset
here a frequency correction can be set.
However, it is much more convenient to determine the correction values automatically in the adjustment menu. To do this, press CAL in the upper right corner of the main screen, see adjustment menu.
After the adjustment the found values can be seen here in the setup menu and can be changed if necessary. The values are in Hz.
TX Power
here you can set the output power of the Pluto in dBm. The maximum value is 0, which corresponds to the highest transmit power.
For smaller powers enter e.g. -5 or -10 etc.
Spectrum / Waterfall Speed
Spectrum and Waterfall are responsible for a large part of the CPU load. To use slower computers like the Raspberry PI 3B+ it is possible to reduce the vertical resolution. Then a trouble-free operation is also possible with simpler computers.
With simple computers, the latency time also increases a bit. You should therefore always use a modern computer like the Odroid C4, Raspberry PI 4 or similar.
Color palette
to set the color of spectrum and waterfall
Language
to set the language of the user interface
QSO Auto Sync
If this function is activated the following happens:
If you click on a QSO track in the “upper” waterfall, the QO100 transceiver tries to push this signal into the listening range (0 - 3kHz). The catch range is approx. +/- 6kHz.
After 2 seconds this function switches off automatically.
This works sometimes better and sometimes worse, after the auto adjust you can still make a fine adjustment.
PTT Mode
Sets the behavior of the PTT, either key mode or toggle mode.


