User Tools
Sidebar
Table of Contents
QO-100 Linux SDR Transceiver
Operation
Spectrum and Waterfall
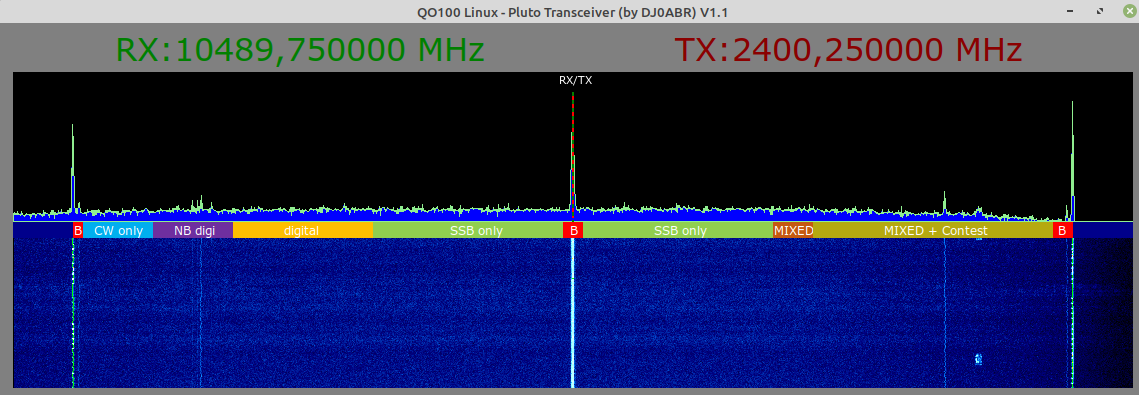
After correctly configuring and starting the QO100 transceiver, you can see the spectrum of the QO100 narrowband transponder in the spectrum/waterfall diagram above:
 the RX and TX frequency are in the middle, on the middle PSK beacon.
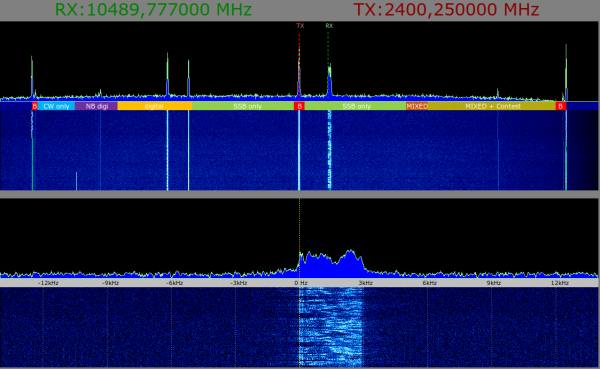
In the lower spectrum/waterfall you can see an enlarged section around the RX frequency:
the receiver is tuned to the center beacon, which can be seen here in the center at offset-0 Hz.
Frequency setting
this is done with the mouse or a touch screen according to these two buttons:
- RX-QRG active … only the RX frequency is adjusted\\.
- TX-QRG active … only the TX frequency is adjusted
- RX and TX QRG active … RX and TX frequency are adjusted. A possible offset between RX and TX remains unchanged.
- neither RX- nor TX-QRG … there is no tuning. This is useful if you want to prevent accidental tuning.
So you select RX-QRG and/or TX-QRG and then click (tap) in the waterfall.
Mouse wheel: changes the frequency for fine tuning. Pressing the ALT or SHIFT (shift) key at the same time will change the mouse wheel increment.
Common procedure:
first one selects the frequency in the upper spectrum/waterfall. If one wants to listen to a running QSO, one clicks on the left edge of the signal, because it is USB (Upper Sideband).
Now you go to the lower waterfall and do the fine tuning. Either with the mouse wheel or touch screen you click in the area around the 0 Hz line to shift the frequency.
Here is an example of a correctly tuned SSB signal. It is in the lower waterfall between the 0 and 3kHz line:

other controls
- RX-QRG … Click in spectrum or waterfall or mouse wheel changes RX frequency
- TX-QRG … click in spectrum or waterfall or mouse wheel changes TX frequency
- R>T … the RX frequency is copied to the TX frequency
- T>R … the TX frequency is copied to the RX frequency
- AUDIO … opens a window with settings for the microphone sensitivity (Mic-Boost should be set to 1 at first. Only if the sound is too quiet you can turn it up) and a bass boost. The bass boost is needed for electret microphones which deliver only little bass.
- MUTE … reduces the volume in headphones or loudspeaker while transmitting. So you are no longer disturbed by listening back. Quietly one hears oneself for control purposes still.
- Compress … switches the audio speech compressor on/off.
- RX and TX Filter … the bandwidth of the audio signal can be adjusted separately for receive and transmit. For SSB QSOs the default setting is: RX = 3.6kHz and TX = 2.7kHz.
- TX Bass … affects the frequency response of the TX audio signal, if enabled, more bass can be heard.
- Audio Loop … The audio signal of the microphone is switched directly to the speaker. This can be used to check the correct function of microphone and speaker.
- RF Loop … the Pluto receiver is set to its own transmitting frequency. So you receive your own transmission without going over the satellite. With this you can check the function up to the Pluto output. Possibly you have to screw a small antenna to the Pluto RX/TX connectors. But usually it works without an antenna.
PTT … Click to send (will turn red). Alternatively you can use the shift keys as PTT.
- Mixer … Opens the Linux sound mixer “pavucontrol”. Here you can not only adjust the volume, but also quickly switch audio sources and audio outputs.
- Setup … opens the setup window
- Info … Information about this program and license information.
Audio Volume
in many cases the default setting is ok. If you want to correct the volume settings, this is done with the volume mixer “pavucontrol”. This is installed and can be called by clicking the “MIXER” button.
In addition to the volume setting, you have comfortable options for assigning audio devices. For example, you can switch the receive signal between the headphones or the speakers in the HDMI monitor without having to change the SETUP of the QO100 transceiver.
If the audio source is too quiet, you still have the option of switching on a pre-amplification with the “AUDIO” button. An always active AGC prevents overdriving the Pluto. Nevertheless, spurious emissions can occur if the microphone level is extremely high.
Special functions
Screen icon …setting of different screen resolutions to adapt the window to the monitor used.
CAL … Menu for convenient setting of the correction values for the pluto and LNB reference frequency
LOCK/FREE … Switching on and off the automatic beacon synchronization. When using a slow computer like Raspberry 3B+ the beacon synchronization must be switched off (FREE).
SAVE/LOAD … Memory for the RX and TX frequency


